Manipulating data
This chapter shows how to modify the contents of a DataCollection: how to change property values,
add new properties, delete particles, or build a dataset from scratch. Please read the Data model chapter first, which
describes how the data in a DataCollection is organized.
You will typically modify data in one of two situations:
Within a user-defined modifier function, which receives a
DataCollectionfrom the pipeline and modifies it in place. This is how you make the modified data available to subsequent modifiers in the pipeline, to OVITO Pro’s viewports, and to functions likeexport_file().On a
DataCollectionreturned byPipeline.compute(). Recall that this is an independent snapshot of the pipeline’s output. Modifying it does not affect the pipeline.
The same rules and programming idioms apply in both situations.
Data ownership
OVITO’s pipeline system avoids unnecessary copies of data as far as possible. To achieve this, data objects follow a shared ownership model:
a data object may be part of more than one DataCollection at the same time.
For example, when you duplicate a DataCollection using its clone() method,
you get a second collection containing the exact same data objects as the original:
data2 = data.clone()
assert data2.particles is data.particles
The assertion shows that both collections refer to one and the same Particles object. The object hasn’t been copied;
it is now owned by both collections.
The pipeline system uses such shallow copies all the time. For instance, the FileSource keeps the data it has loaded
from the input file in memory (see FileSource.data), so that the pipeline can be re-evaluated quickly after
a modifier has been changed, without reloading the file. The modifiers then work on a shallow copy of this master copy: a modifier that computes
a new particle property, for example, adds the new property to the copied Particles container, while the other data objects,
like the simulation cell, remain shared with the master copy.
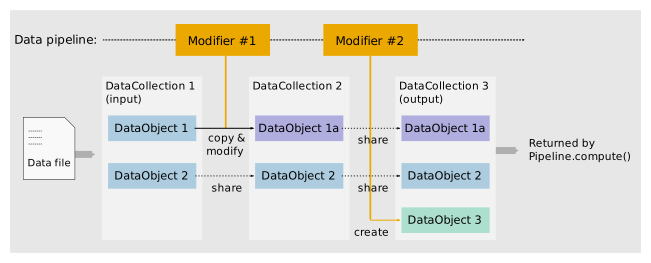
Shared data objects must not be modified, because the change would affect all collections sharing the object – including the pipeline’s internal
master copy. Before modifying a data object, you first need to make sure that it is exclusively owned by your DataCollection.
Announcing modifications with _
OVITO’s Python interface has safeguards in place that prevent you from accidentally modifying shared data objects. Consider the following attempt to change the periodic boundary conditions of the simulation cell in a data collection returned by the pipeline:
data.cell.pbc = (True, True, False)
RuntimeError: You tried to modify a SimulationCell object that is currently shared by multiple owners.
Please explicitly request a mutable version of the data object by using the '_' notation or by
calling make_mutable() on the parent object. See the documentation of the DataObject.make_mutable()
method for further information.
The assignment fails, because the SimulationCell object is shared with the pipeline’s internal data.
The solution is to append an underscore to the name of the field you use to access the object:
data.cell_.pbc = (True, True, False)
The underscore suffix tells the DataCollection that you intend to modify the simulation cell. If the cell object is shared with
other owners, the data collection replaces it with an exclusively owned copy before returning it to you. This copy-on-write step is cheap if the
object is already exclusively owned.
The underscore notation is available for all fields that provide access to data objects, including the property fields of property containers. Accessing a nested object requires the underscore at each level, because modifying a child object also constitutes a modification of its parent:
data.particles_.positions_           # Modifiable particle positions
data.particles_["Position_"]         # Same, using dictionary-style lookup
data.particles_.bonds_.topology_     # Modifiable bond topology
data.surfaces_["surface_"]           # Modifiable surface mesh
Tip
Use the underscore notation only where you actually modify data. Requesting a modifiable version of a large data object needlessly may trigger an expensive copy.
Alternatively, you can call make_mutable() on the parent object to obtain a modifiable version of a child object.
Creating properties
To add a new property to particles (or any other property container), use the create_property() method.
It accepts the name of the property and, optionally, an array with the initial values:
colors = numpy.random.default_rng().random(size=(data.particles.count, 3))
data.particles_.create_property("Color", data=colors)
Note the underscore in particles_, which is needed because adding a property modifies the Particles container.
If a property with the given name already exists, create_property() overwrites its values.
If the name matches one of the standard particle properties, such as Color in the example above,
the data type and number of components of the new property are prescribed by OVITO. For a user-defined property, OVITO infers them from the
data array you provide:
distances = numpy.linalg.norm(data.particles.positions, axis=1)
data.particles_.create_property("Distance From Origin", data=distances)
You can also create a property without initial values and fill in the values in a second step. For a user-defined property, you then need to specify the data type and number of components explicitly:
prop = data.particles_.create_property("Cluster Label", dtype=int, components=1)
prop[:] = -1
prop[data.particles.positions[:,2] > 0] = 1
Bond properties
Bond properties are created in the same way. Since the Bonds container is part of the Particles object,
you need the underscore notation at both levels:
bond_colors = numpy.random.default_rng().random(size=(data.particles.bonds.count, 3))
data.particles_.bonds_.create_property("Color", data=bond_colors)
Modifying property values
Changing the values of an existing property works like changing the values of a NumPy array; just use the underscore notation to make the property array modifiable:
# Move the first particle to new xyz coordinates:
data.particles_.positions_[0] = (10.0, 8.0, 4.5)

# Displace the first particle by 2 length units along the x-axis:
data.particles_.positions_[0] += (2.0, 0.0, 0.0)

# Displace all particles by 1 length unit along the z-axis:
data.particles_.positions_[:] += (0.0, 0.0, 1.0)
You can use NumPy’s advanced indexing to modify a subset of the elements:
selection = data.particles_.create_property("Selection", data=(data.particles["peatom"] < -4.2))

# Displace only the selected particles:
data.particles_.positions_[selection != 0] += (0.0, 0.0, 1.0)

# Alternatively, modify just the z-component of each position vector:
data.particles_.positions_[selection != 0, 2] += 1.0
If you make several changes to the same property, you can obtain the modifiable array once, e.g. using a with statement:
with data.particles_.positions_ as positions:
    positions[:,0] *= 1.1
    positions[:,1] *= 1.1
Deleting elements
To delete particles (or the elements of any other property container), call delete_elements() with a Boolean mask
selecting the elements to delete, or delete_indices() with a list of indices. All properties of the container get
updated accordingly:
# Delete all particles located above z=10:
data.particles_.delete_elements(data.particles.positions[:,2] > 10.0)
print("Remaining particles:", data.particles.count)
Bonds connected to deleted particles are deleted as well, and the indices stored in other element references get updated automatically.
Floating-point precision of standard properties
By default, OVITO stores particle coordinates and other real-valued standard properties in double precision (64-bit).
For very large systems, you can store them in single precision (32-bit) instead, which halves their memory footprint. This is supported by all
real-valued standard particle properties, e.g. Position, Velocity, Force, Mass, and Displacement, and by the Position
and Direction properties of Lines and Vectors.
When loading a simulation file, use the float_precision parameter of the import_file() function to request single-precision storage:
pipeline = import_file('large_system.dump', float_precision='float32')
The file reader then stores the real-valued particle properties it loads from the file in single precision. It also sets the
float_precision attribute of the Particles container to 'float32'.
This attribute gets passed down the pipeline and determines the precision of standard properties that modifiers create later, for example the
Displacement property computed by the CalculateDisplacementsModifier. An existing property always keeps its
precision when a modifier changes its values.
In your own code, e.g. in a custom file reader or a custom pipeline source,
you can select the precision of a new standard property using the dtype parameter of create_property(),
or set the container’s float_precision attribute to apply it to all standard properties created subsequently:
data.particles_.float_precision = 'float32'
data.particles_.create_property('Position', data=coords)             # Stored in single precision
data.particles_.create_property('Mass', dtype=numpy.float64, data=m)  # Explicit precision takes priority
OVITO’s built-in algorithms perform their internal calculations in double precision regardless of the storage precision of their inputs.
Note, however, that a NumPy view of a single-precision property has the dtype numpy.float32, so arithmetic operations you perform on
such an array in your own Python code use single precision.
Setting global attributes
The attributes field of a DataCollection is a Python dictionary. Adding, changing, or removing
global attributes works like modifying a dictionary:
data.attributes["Mean Energy"] = numpy.mean(data.particles["peatom"])
data.attributes["Energy Per Volume"] = data.attributes["Mean Energy"] * data.particles.count / data.cell.volume
Note
The underscore notation is not needed for the attributes dictionary.
Modifying the simulation cell
The SimulationCell object behaves like a 3x4 NumPy matrix, whose columns are the three cell vectors and the cell origin.
To change the cell geometry, assign new values to the matrix columns:
data.cell_[:,0] = (170.0,   0.0,  0.0)  # Cell vector a
data.cell_[:,1] = (  0.0, 125.0,  0.0)  # Cell vector b
data.cell_[:,2] = (  5.0,   0.0, 80.0)  # Cell vector c (tilted)
data.cell_[:,3] = (-85.0, -62.5, -40.0) # Cell origin
This changes only the shape of the simulation cell, not the particle coordinates. To deform the cell together with its contents,
use the AffineTransformationModifier instead.
Applying modifiers to a data collection
The built-in modifiers are normally part of a Pipeline. But you can also apply a modifier directly to a
DataCollection using its apply() method. The modifier then modifies the data in place:
from ovito.modifiers import ExpressionSelectionModifier, DeleteSelectedModifier

data.apply(ExpressionSelectionModifier(expression="peatom > -3.9"))
data.apply(DeleteSelectedModifier())
This can be easier than setting up a pipeline, but it works only for one data collection, i.e. one frame of a trajectory, at a time. The typical use case is a user-defined modifier function, which employs a built-in modifier as a sub-operation of its own algorithm.
Creating data from scratch
You don’t always need a simulation file to work with OVITO. The following example creates a new DataCollection
from scratch, fills it with particles, and processes it with a pipeline:
import numpy
from ovito.data import DataCollection
from ovito.pipeline import Pipeline, StaticSource
from ovito.modifiers import CreateBondsModifier

# Create an empty dataset and give it a simulation cell (a cube with 10 units edge length):
data = DataCollection()
data.create_cell(numpy.diag([10.0, 10.0, 10.0]), pbc=(True, True, True))

# Add 100 particles at random positions, all of the same type "Ar":
positions = numpy.random.default_rng().random(size=(100, 3)) * 10.0
particles = data.create_particles(count=len(positions))
particles.create_property("Position", data=positions)
type_property = particles.create_property("Particle Type")
type_property[:] = type_property.add_type_name("Ar", particles).id

# Wrap the dataset in a pipeline to process it with modifiers:
pipeline = Pipeline(source=StaticSource(data=data))
pipeline.modifiers.append(CreateBondsModifier(cutoff=1.5))
print("Number of bonds:", pipeline.compute().particles.bonds.count)
The create_cell() and create_particles() methods add a new simulation cell and
particles container to the dataset. add_type_name() defines a new particle type and returns it.
The StaticSource feeds the dataset into the pipeline.
See also
User-defined pipeline sources – Generating data dynamically in a pipeline source