Data pipelines
If you have worked with the OVITO desktop application before, you are already familiar with the concept of a data pipeline: after loading a simulation file, you insert modifiers into the pipeline, which filter, transform, or analyze the data one after the other. OVITO computes the output of the pipeline and displays it in the interactive viewports. The pipeline is non-destructive: the input file stays untouched, and you can change or remove modifiers at any time.
OVITO’s Python API is built around the same concept. This chapter explains how you set up and evaluate pipelines in Python.

Creating a pipeline
A pipeline is represented by an instance of the Pipeline class. It has a data source, which provides the input data
for the pipeline, and a list of modifiers, which is initially empty. You typically create a new pipeline by loading a simulation file with
the import_file() function:
from ovito.io import import_file

pipeline = import_file("input/simulation.dump")
print(pipeline.source)
import_file() wires the new pipeline to a FileSource, which loads the data from the given file.
The FileSource is accessible through the pipeline’s source field:
<FileSource at 0x109106c48>
You can later point the FileSource to a different input file, for instance, to batch-process
many simulation files with one and the same pipeline (see File I/O). Other kinds of data sources exist as well:
a StaticSource feeds a DataCollection you have created in memory into the pipeline, and
a PythonSource calls a Python function you have written to generate the input data dynamically
(see User-defined pipeline sources).
Applying modifiers
You insert a modifier into a pipeline by creating an instance of one of the modifier classes from the ovito.modifiers module and
adding it to the pipeline’s modifiers list:
from ovito.modifiers import RadialDistributionFunctionModifier, ExpressionSelectionModifier

pipeline.modifiers.append(RadialDistributionFunctionModifier(cutoff=3.2, number_of_bins=200))
pipeline.modifiers.append(ExpressionSelectionModifier(expression="Coordination < 10"))
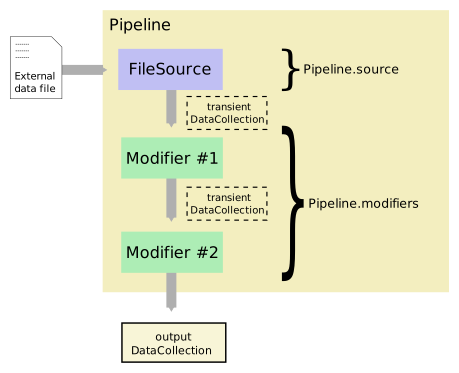
The modifiers get applied to the data in the order in which they appear in the list: a modifier only sees the data that has
already been processed by the modifiers preceding it. In the example above, the RadialDistributionFunctionModifier
first computes the radial distribution function and, as a by-product, the number of neighbors of each atom, which it stores in the new particle property Coordination.
The ExpressionSelectionModifier can then select atoms based on the values of this property.
Every modifier has a set of parameters, which correspond to the fields you know from the modifier’s panel in the graphical user interface. You can set the parameters as keyword arguments when constructing the modifier, as done above. This is equivalent to assigning the parameter values one by one after constructing the modifier, which is the more convenient option only if you don’t know the values at construction time:
modifier = RadialDistributionFunctionModifier()
modifier.cutoff = 3.2
modifier.number_of_bins = 200
pipeline.modifiers.append(modifier)
The ovito.modifiers module documents all available modifier classes and their parameters.
If none of them does what you need, you can write your own modifier in Python.
Evaluating the pipeline
Adding modifiers to a pipeline doesn’t trigger any computation yet. A pipeline gets evaluated only when someone requests its output data.
You do this explicitly by calling the pipeline’s compute() method, which loads the input data
from the source, lets the modifiers process it one after the other, and returns the results as a DataCollection:
data = pipeline.compute()
print("Number of selected atoms:", data.attributes["ExpressionSelection.count"])
The DataCollection contains the particles, the simulation cell, and all other data produced by the pipeline,
including global attributes such as ExpressionSelection.count, which the ExpressionSelectionModifier
outputs to report the number of selected atoms. The Data model chapter describes the structure of a DataCollection in detail.
Some other functions evaluate the pipeline implicitly, because they need its output: export_file() writes the output of a pipeline to a file,
and Viewport.render_image() renders an image of all pipelines in the scene. In OVITO Pro, the pipelines are also evaluated
whenever the interactive viewports need to be refreshed.
If the pipeline could not be evaluated successfully, e.g., due to an invalid modifier parameter or an I/O error, compute()
raises a RuntimeError exception.
Changing a pipeline
You can change the parameters of modifiers, insert new modifiers, or remove modifiers from a pipeline at any time. In a Python script, such changes don’t take effect until you request a new evaluation of the pipeline. This is different from the graphical user interface, where OVITO recomputes the pipeline immediately after every change to update the viewports:
# Change a parameter of the second modifier in the pipeline:
pipeline.modifiers[1].expression = "Coordination < 11"

# Insert another modifier at the front of the pipeline:
from ovito.modifiers import AffineTransformationModifier
pipeline.modifiers.insert(0, AffineTransformationModifier(transformation=[[1.02, 0, 0, 0],
                                                                          [0, 1.02, 0, 0],
                                                                          [0, 0, 1.02, 0]]))

# Request a new evaluation of the changed pipeline:
data = pipeline.compute()
print("Number of selected atoms:", data.attributes["ExpressionSelection.count"])
The modifiers list supports the usual operations of a Python list, e.g., removing an entry:
del pipeline.modifiers[0] # Remove the first modifier from the pipeline
OVITO keeps the results of pipeline evaluations in internal caches. Calling compute() repeatedly
without changing anything in the pipeline doesn’t trigger a recomputation. After a change, only the modifiers that are affected by the
change get re-evaluated.
The returned data is an independent snapshot
The DataCollection returned by compute() is a copy of the pipeline’s output.
It is not connected to the pipeline in any way: it does not reflect subsequent changes you make to the pipeline, and changes you make to the
returned data do not affect the pipeline. The following code, for example, does not work as intended:
data = pipeline.compute()
data.particles_.create_property("Height", data=data.particles.positions[:,2])

pipeline.modifiers.append(ExpressionSelectionModifier(expression="Height > 0"))
data = pipeline.compute()   # Error: The modifier doesn't see the particle property "Height"
The second compute() call fails, because the ExpressionSelectionModifier refers to
a particle property Height that doesn’t exist in the pipeline. The property was added to the returned snapshot only, which is not seen by the modifiers
in the pipeline. To make a new property available to downstream modifiers, you have to create it within the pipeline. This is done by
inserting a user-defined modifier function into the pipeline:
def add_height_property(frame, data):
    data.particles_.create_property("Height", data=data.particles.positions[:,2])

pipeline.modifiers.append(add_height_property)
pipeline.modifiers.append(ExpressionSelectionModifier(expression="Height > 0"))
data = pipeline.compute()   # OK
There is one exception to the independence of the snapshot: the visual elements attached to data objects are not copied. Changing a visual element obtained from the snapshot, e.g. the display radius of particles, affects the rendering of the pipeline’s output.
Accessing the pipeline’s input data
Sometimes you need access to the original data that enters the pipeline, before any modifiers have been applied.
The pipeline’s data source provides a compute() method, too:
input_data = pipeline.source.compute()
print("Properties loaded from file:", list(input_data.particles.keys()))
print("Properties after pipeline:  ", list(pipeline.compute().particles.keys()))
Properties loaded from file: ['Position', 'Particle Identifier', 'peatom', 'Particle Type', 'Force']
Properties after pipeline:   ['Position', 'Particle Identifier', 'peatom', 'Particle Type', 'Force', 'Coordination', 'Selection']
Processing simulation trajectories
If the data source provides a sequence of simulation snapshots, e.g. when you load a trajectory,
the pipeline can produce output for each frame of the trajectory. Yet, a pipeline always processes just one frame at a time.
Its num_frames property tells you how many frames are available:
from ovito.modifiers import ClusterAnalysisModifier

pipeline = import_file("input/simulation.*.dump")
pipeline.modifiers.append(ClusterAnalysisModifier(cutoff=2.8, sort_by_size=True))

print("Number of frames:", pipeline.num_frames)
To request the pipeline’s output for a particular frame, pass the frame number to compute().
Frames are numbered starting at 0:
data = pipeline.compute(1)   # Evaluate the pipeline at the second frame
print("Number of clusters:", data.attributes["ClusterAnalysis.cluster_count"])
If you don’t specify a frame number, compute() evaluates the pipeline at frame 0 when running in a Python script,
or at the current position of the animation time slider when running in the context of OVITO Pro.
To process all frames of a trajectory, use a for-loop:
for frame in range(pipeline.num_frames):
    data = pipeline.compute(frame)
    print(frame, data.attributes["ClusterAnalysis.cluster_count"])
Alternatively, you can iterate over the pipeline’s frames property, which yields the
DataCollection of each frame:
for data in pipeline.frames:
    print(data.attributes["SourceFrame"], data.attributes["ClusterAnalysis.cluster_count"])
Warning
Set up the pipeline completely before entering the loop over the frames. A common mistake is to insert modifiers into the pipeline inside the loop:
# WRONG!
for data in pipeline.frames:
    pipeline.modifiers.append(AtomicStrainModifier(cutoff=3.2))
    ...
Since the loop body gets executed once per frame, this code keeps appending more and more modifiers to the pipeline, which all perform the same computation over and over again. The correct approach:
# Step I: Populate the pipeline with modifiers.
pipeline.modifiers.append(AtomicStrainModifier(cutoff=3.2))

# Step II: Evaluate the pipeline for each frame.
for data in pipeline.frames:
    ...
Changing the parameters of existing modifiers inside the loop is fine, though.
Note that the frame-by-frame processing model also applies to modifiers. Most modifiers compute their results from the current frame alone.
Some modifiers, such as the CalculateDisplacementsModifier or the TimeAveragingModifier,
need access to other frames of the trajectory, too; they request them from the upstream pipeline automatically. You can write such modifiers
yourself using the advanced modifier interface.
The scene
A pipeline, by itself, is just a data processing object. It doesn’t appear in rendered images or in the interactive viewports of OVITO Pro
until you insert it into the scene by calling its add_to_scene() method:
import ovito

pipeline = import_file("input/simulation.dump")
pipeline.add_to_scene()

print(ovito.scene.pipelines)
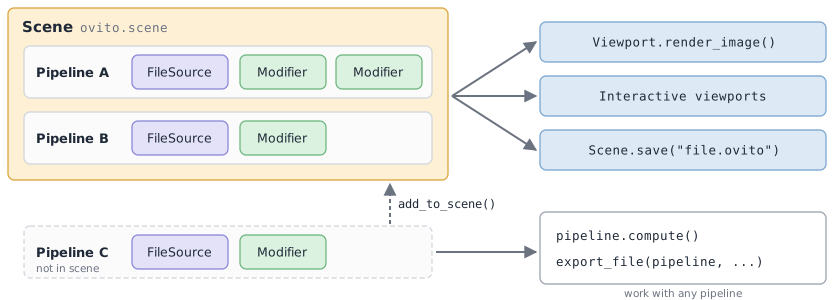
The scene is represented by the Scene class. It contains all pipelines that are visible in the three-dimensional space and
represents everything that gets saved to a .ovito session state file (see Session state files). The current scene is accessible through the
global variable ovito.scene, and its pipelines list tells you which pipelines it contains.
Important
When you load a file with in the graphical user interface, OVITO automatically inserts the new pipeline into the scene.
The import_file() function does not do that. In a Python script, you have to call add_to_scene()
yourself if you want to render images of the pipeline’s output or save the pipeline to a session state file.
It is not necessary for compute() or export_file(), which work with any pipeline.
Use remove_from_scene() to take a pipeline out of the scene again:
pipeline.remove_from_scene()
The scene in OVITO Pro OVITO Pro
In a Python script executed by an external interpreter, ovito.scene refers to one and the same Scene object during the entire lifetime
of the program. Inside the OVITO Pro desktop application, ovito.scene refers to the scene of the session currently open in the program window.
OVITO Pro updates this variable each time it executes Python code, e.g., when you run a script via .
Since the user may open a different session state file in the meantime, your code should always access the scene through ovito.scene and not keep
references to the Scene object in global variables.
The Scene.selected_pipeline property gives you access to the pipeline that is currently selected in the
pipeline editor of OVITO Pro. This lets you write scripts that operate on whatever data the user has loaded, for instance:
data = ovito.scene.selected_pipeline.compute()
The Preloading session state section explains how to run a script in the context of a session state file you have prepared with the graphical user interface.